這是 iOS APP 初學: 網路文章閱讀器 的第二篇,第一篇請參考「【Mac OS 教學】用 Xcode 輕鬆製作簡單實用的 iOS APP!(上)」。在第一篇教學已經知道如何用 table view 產生動態列表,也知道如何在 – table View:cell For Row At Index Path,設定 table view 的每個 row 裡要顯示什麼內容。
這一篇要學習如何使用第三方的程式 AFNetworking,下載網路上的資料放進每個 row 的 cell 裡,然後點了 row 後要如何使用 web view 瀏覽網路上的內容。
◎ 熱門文章的 JSON 檔格式
先看一下我們要抓的 JSON檔 http://disp.cc/api/hot_text.json
這是由 Server 端產生的檔案,裡面的資料格式可以自行設計
在這邊他的格式是像這樣
{ “err”:0, “list”:[Row1, Row2, …, RowN] }
最外層是一個 JS 物件,裡面有兩個值
“err” 是代表產生的檔案有沒有錯誤,沒問題的話就是 0
“list” 為一個 JS 陣列,裡面存了 N 個 JS 物件,記錄了每篇熱門文章的資料,他的格式是像這樣
hot_num 是這篇文章目前的人氣值
bi 是看板的編號,ti 是文章的編號,文章的網址為 http://disp.cc/m/{bi}-{ti}
在 Objective-C 裡,要將 JS 物件存成 NSDictionary
將 JS 陣件存成 NSArray
◎ 使用 AFNetworking
用 AFNetworking 可以很容易的將 JSON 檔 轉成 NSDictionary 和 NSArray
首先到 AFNetworking 的 GitHub 頁,點「Download Zip」下載
https://github.com/AFNetworking/AFNetworking
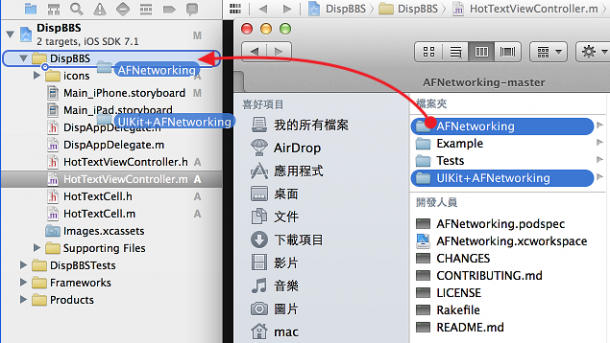
解壓縮後,將裡面的兩個資料夾:「AFNetworking」、「UIKit+AFNetworking」
拖至專案的資料夾
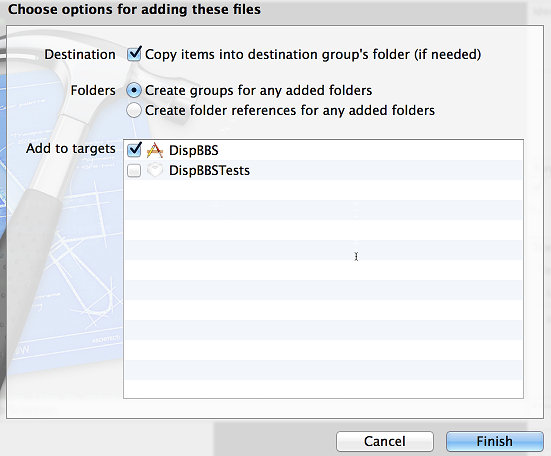
在跳出來的對話視窗,要點選「Copy items into…」以及「Create groups for …」
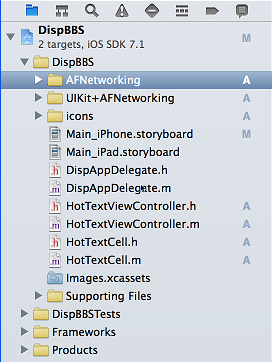
完成後像這樣
其中 UIKit+AFNetworking 資料夾是把一些 UI 元件的 class 修改成可以有網路功能
例如這個 APP 就會用到 UIImageView+AFNetworking 讓 UIImageView 元件可以顯示網路上的圖
接著我們要在 HotTextViewController 這個頁面產生時
使用 AFNetworking 下載熱門文章的 JSON 檔: http://disp.cc/api/hot_text.json
轉成 NSMutableArray 後存成 HotTextViewController 這個類別的屬性
再用 HotTextViewController 的方法 -tableView:cellForRowAtIndexPath
將熱門文章的內容填入每個 row 的 cell 裡
首先編輯 HotTextViewController.h 檔
在 @interface HottextViewController : UITableViewController
和 @end 的中間,加上一個 property
@property (nonatomic, strong) NSMUtableArray *hotTexts;
編輯 HotTextViewController.m 檔
在 #import “HotTextCell.h” 這行下面加上
#import “AFNetworking.h”
這樣就可以使用 AFNetworking 提供的類別了
在 @implementation HotTextViewController 這行下面
新增一個類別的方法 -loadHotText
– (void)loadHotTexts
{
// 設定類別屬性 hotTexts 的初始大小為20,用來存抓下來的熱門文章列表
self.hotTexts = [NSMutableArray arrayWithCapacity:20];
// 將網址字串轉為 NSURLRequest 物件 request
NSString *urlString = @”http://disp.cc/api/hot_text.json”;
NSURL *url = [NSURL URLWithString:urlString];
NSURLRequest *request = [NSURLRequest requestWithURL:url];
// 使用 AFNetworking 的類別 AFHTTPRequestOperation 建立物件 operation
AFHTTPRequestOperation *operation = [[AFHTTPRequestOperation alloc] initWithRequest:request];
// 設定將傳回的資料從 JSON 轉為 NSDictionary
operation.responseSerializer = [AFJSONResponseSerializer serializer];
// 設定 operation 執行成功及失敗後要做什麼
[operation setCompletionBlockWithSuccess:^(AFHTTPRequestOperation *operation, id responseObject) {
// 將抓回來的資料存成 NSDictionary 的物件 data
NSDictionary *data = (NSDictionary *) responseObject;
// 用 NSLog 顯示錯誤訊息
NSLog(@”err:%@”,data[@”err”]);
// 將 data 裡的陣列 list 存到 hotTextViewController 的屬性 hotTexts
self.hotTexts = data[@”list”];
// 重新顯示 tableView
[self.tableView reloadData];
} failure:^(AFHTTPRequestOperation *operation, NSError *error) {
// opration 執行失敗的話用 UIAlertView 顯示錯誤訊息
UIAlertView *alertView = [[UIAlertView alloc] initWithTitle:@”Error Retrieving HotTexts”
message:[error localizedDescription]
delegate:nil
cancelButtonTitle:@”Ok”
otherButtonTitles:nil];
[alertView show];
}];
// 執行 operation
[operation start];
}
修改 -viewDidLoad
此方法會在頁面產生時執行
在 [super viewDidLoad]; 這行下面加上
[self loadHotTexts];
就會在熱門文章的頁面產生時執行 -loadHotTexts 了
修改 -tableView:numberOfRowsInSection
將內容改為 return [self.hotTexts count];
將 Rows 的數目改為載入的陣列 hotTexts 的大小
修改 -tableView:cellForRowAtIndexPath:
將之前加上的
cell.titleLabel.text = …
cell.descLabel.text = …
這兩行刪掉,改成這三行
cell.titleLabel.text = hotText[@”title”];
cell.descLabel.text = hotText[@”desc”];
其中第一行是將之前載入的陣列 hotTexts 取出第 indexPath.row 個值
存成 NSDictionary 的物件 hotText
再將其中的 title 與 desc 存入 cell 的屬性
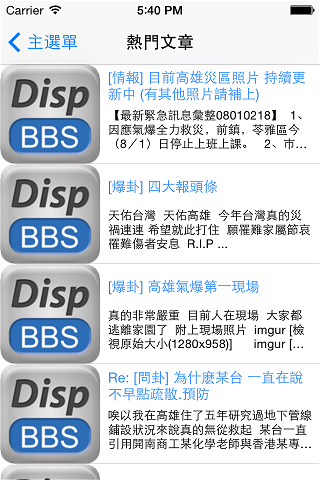
執行一下看看有沒有成功
接下來要讀取縮圖的網址並設定在 cell 裡的 UIImageView
要讓 UIImageView 可以顯示網路上的圖,必需使用 UIImageView+AFNetworking
在檔案上方的 #import “AFNetworking.h” 的下一行再加上
然後在 -tableView:cellForRowAtIndexPath: 裡
刪除之前加的 cell.thumbImageView.image = … 這行
改為
//取出hotText裡的陣列 img_list,可能會有0~3個縮圖
NSArray *img_list = hotText[@”img_list”];
if ([img_list count]) { //如果有縮圖的話
//在網路上的圖還沒載入前,先顯示 displogo
UIImage *placeholderImage = [UIImage imageNamed:@”displogo120.png”];
//取得陣列 img_list 裡的第一個縮圖網址,轉為 NSURLRequest
NSString *imgUrlString = img_list[0];
NSURL *url = [NSURL URLWithString:imgUrlString];
NSURLRequest *request = [NSURLRequest requestWithURL:url];
//載入網路上的縮圖,並設定到 cell 的 thumbImageView
__weak HotTextCell *weakCell = cell;
[cell.thumbImageView setImageWithURLRequest:request
placeholderImage:placeholderImage
success:^(NSURLRequest *request, NSHTTPURLResponse *response, UIImage *image) {
weakCell.thumbImageView.image = image;
[weakCell setNeedsLayout];
} failure:nil
];
} else { //沒有縮圖的話,使用 displogo 當縮圖
cell.thumbImageView.image = [UIImage imageNamed:@”displogo120.png”];
}
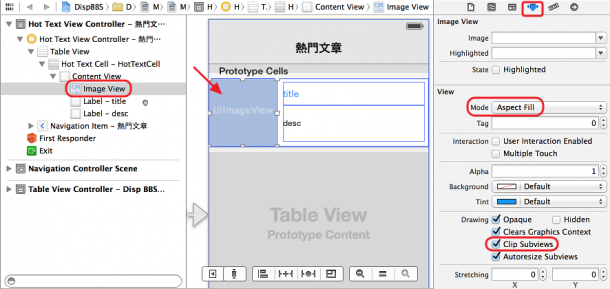
打開 storyboard 將縮圖的 UIImageView 的屬性設定為
Mode: Aspect Fill,等比例縮小到長或寬其中一個符合顯示範圍
Drawing 裡的 Clip Subviews 要打勾,裁切掉超出顯示範圍的部份
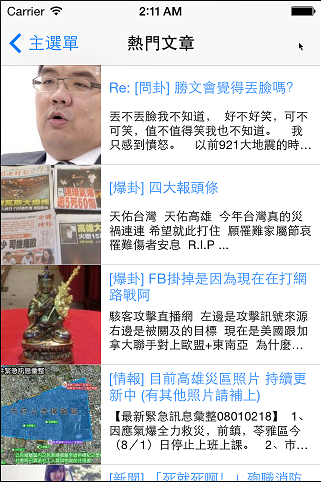
執行看看
接下來要加上點一下熱門文章的列表後,會開啟的 web view 頁面
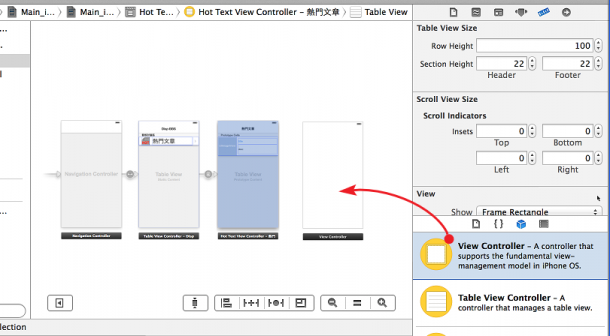
到 storyboard,拖一個 View Controller 進來
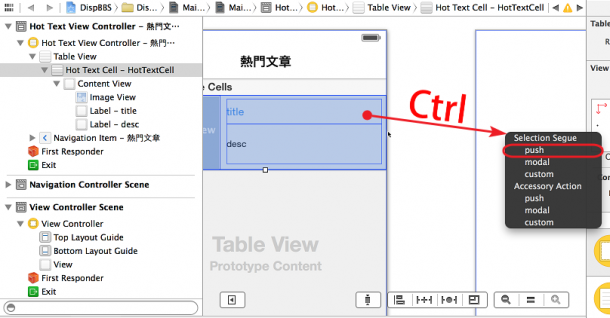
點 HotTextCell,按著 Ctrl 鍵 拉到新的 View Controller,選 Selction Segue 的 push
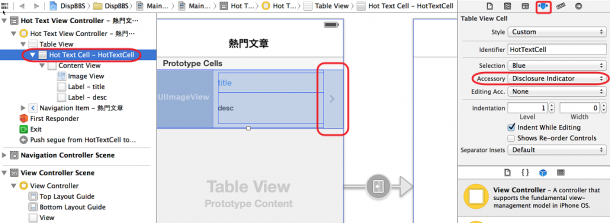
發現 cell 的右邊多了個鍵頭,把本來的 title 和 desc 擋住了
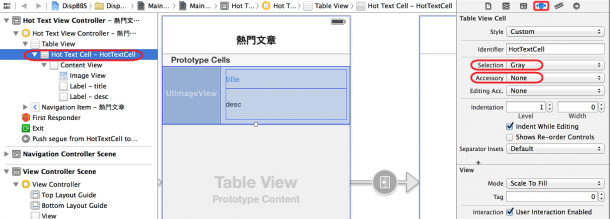
可以到 cell 的屬性設定,將 Accessory 改成 None
順便將 Selection 改成 Gray,點選後底色變灰色
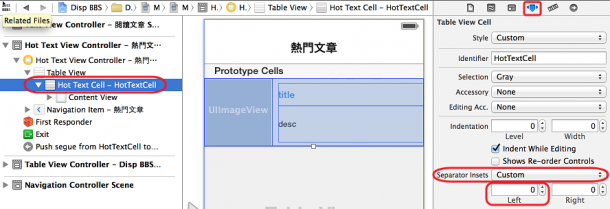
還有每個 Row 之間的分隔線,預設在左邊有15px的間距
可以在 Separator Insets 這邊選「Custom」後,將 Left 改成 0
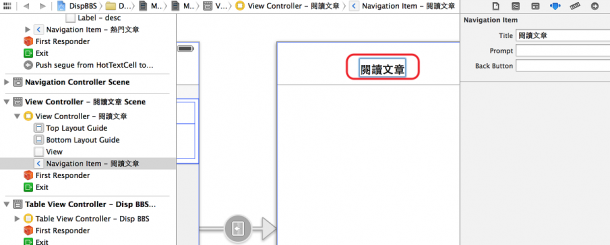
點兩下新的 View Controller 上面的 Navigation,輸入「閱讀文章」
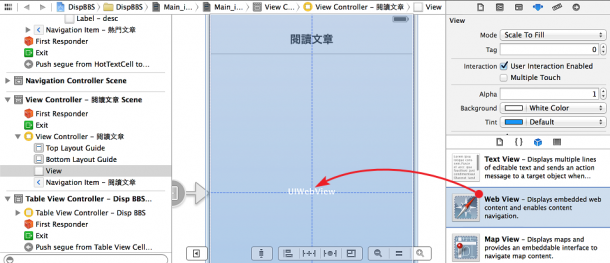
拉一個 Web View 進來,大小就跟設為跟 View Controller 一樣大
幫新的 View Controller 建立一個類別
按 command+n 新增 Objective-C class 檔案
類別名稱 Class: TextViewController
繼承自 Subclass of: UIViewController
新增完後,編輯 TextViewController.h
在 @interface TextViewController : UIViewController 這行下面
幫這個類別新增兩個屬性
@property (nonatomic, strong) NSString *urlString;
其中 webView 有加 IBOutlet,是用來連結 storyboard 上的 Web View
urlString 是用來儲存文章網址,網址會從熱門文章頁傳來,再設定到 webView 上
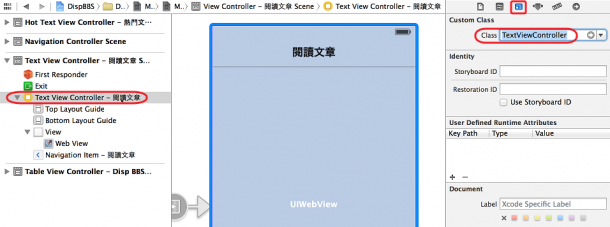
到 storyboard,點一下新的 View Controller,再點 Identity設定
設定 Custom Class 為 TextViewController
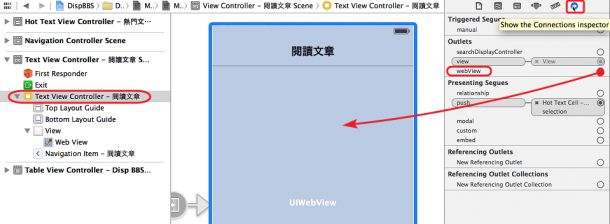
再點一下 Connections設定,裡面的 Outlets 有我們剛剛加的 webView
將右邊的圈圈拖到閱讀文章頁上面的 Web View
再來我們要讓熱門文章列表頁點擊時,會將文章網址傳給閱讀文章頁
編輯 HotTextViewcontroller.m
在上方加上 #import “TextViewController.h”
將最後面預先產生的 -prepareForSegue:sender: 的註解/* */拿掉,並修改為
#pragma mark – Navigation
– (void)prepareForSegue:(UIStoryboardSegue *)segue sender:(id)sender
{
//從屬性 hotTexts 中,利用目前點選第幾個 Row,來取得點選文章的網址
NSDictionary *hotText = self.hotTexts[self.tableView.indexPathForSelectedRow.row];
NSString *urlString = [NSString stringWithFormat:@”http://disp.cc/m/%@-%@”, hotText[@”bi”], hotText[@”ti”]];
//透過 segue 取得目標頁面的 View Controller,將網址存到該類別的屬性
TextViewController *textViewController = segue.destinationViewController;
textViewController.urlString = urlString;
}
在點擊 table view 上的 row 後,就會執行 -prepareForSegue:sender:
然後再換到新的頁面
現在我們已經將網址傳到閱讀文章頁的 TextViewController 了
接著我們要把網址設定到 web view 上
修改 TextViewController.m
在前面的 #import “TextViewController.h” 下一行加上
#import “AFNetworking.h”
#import “UIWebView+AFNetworking.h”
這樣就可以使用 AFNetworking 修改過的 UIWebView
接著修改 -viewDidLoad
在 [super viewDidLoad] 這行下面加上
NSURLRequest *urlRequest = [NSURLRequest requestWithURL:url];
[self.webView loadRequest:urlRequest progress:nil success:^NSString *(NSHTTPURLResponse *response, NSString *HTML) {
return HTML;
} failure:^(NSError *error) {
NSLog(@”error: %@”,[error localizedDescription]);
}];
這樣就可以在閱讀文章頁載入時,將網址傳給 web View,並載入該網頁了
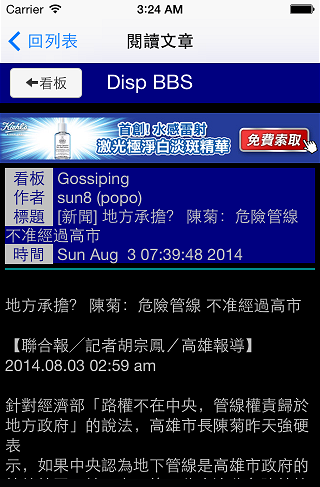
按 command+r 執行看看g
◎ 顯示”載入中…”的圖示
在載入網頁時,如果網路很慢,程式會像沒反應一樣
應該要加個載入中的圖示比較好
而 AFNetworking 有提供一個簡單的方法
修改 DispAppDelegate.m
在 #import “DispAppDelegate.h” 的下一行加上
#import “AFNetworkActivityIndicatorManager.h”
然後修改 – application:didFinishLaunchingWithOptions: 這個方法
在 return YES; 前一行加上
AFNetworkActivityIndicatorManager.sharedManager.enabled = YES;
這樣就可以在程式執行後,啟動 AFNetworkActivityIndicatorManager
![]()
之後只要是用 AFNetworking 來做存取網路的動作時
程式的上方就會出現轉圈圈的圖示了
但是在開啟 web view 時,只有一開始會顯示一下載入中
接著 web view 裡的網頁再載入其他檔案,像是圖檔、JS檔時,就不會顯示載入中了
需要修改一下 UIWebView 的 delegate 方法
讓 web view 可以在載入檔案時,通知 AFNetworkActivityIndicatorManager
修改 TextViewController.h
將 @interface TextViewController : UIViewController 這行改為
@interface TextViewController : UIViewController <UIWebViewDelegate>
也就是在後面加一個 <UIWebViewDelegate>
讓類別 TextViewController 可以執行 UIWebView 的 delegate 方法
修改 TextViewController.m
前面的 #import 再加上一行
#import “AFNetworkActivityIndicatorManager.h”
才能使用 AFNetworkActivityIndicatorManager
修改 -viewDidLoad 方法,裡面再加一行
self.webView.delegate = self;
設定 webView 會將 delegate 事件傳給 TextViewController
接著在後面新增三個 UIWebview 的 delegate 方法
– (void)webViewDidStartLoad:(UIWebView *)webView
{ // web view 中有載入事件時,將 manager 的計數器+1
[AFNetworkActivityIndicatorManager.sharedManager incrementActivityCount];
}
– (void)webViewDidFinishLoad:(UIWebView *)webView
{ // web view 中的載入事件結束時,將 manager 的計數器-1
[AFNetworkActivityIndicatorManager.sharedManager decrementActivityCount];
}
– (void)webView:(UIWebView *)webView didFailLoadWithError:(NSError *)error
{ // web view 中的載入事件失敗時,將 manager 的計數器-1
[AFNetworkActivityIndicatorManager.sharedManager decrementActivityCount];
}
其中 manager 計數器原本為 0,只要變成大於 0 的話,程式上方就會顯示載入中
所以產生了幾個連線加了多少,就要有一樣的連線結束將數字減回來,載入中才會消失
◎ 設定 Auto Layout
到這邊大致上已經完成了,但還有點問題就是
如果把螢幕橫著放 (在 XCode 的模擬器按command+→)
會變成像這樣

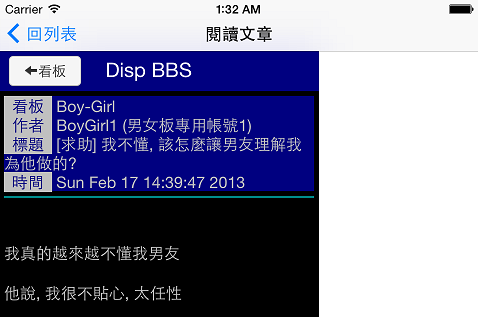
版面沒有自動調整
如果不想讓 APP 可以轉方向的話
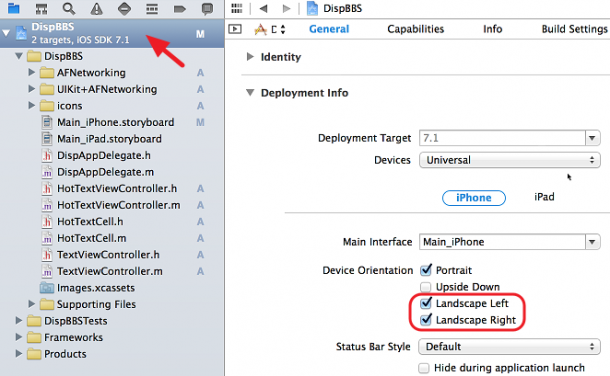
可以在專案設定 → Deployment Info → Device Orientation
將 Landscape Left 與 Landscape Right 取消勾選即可
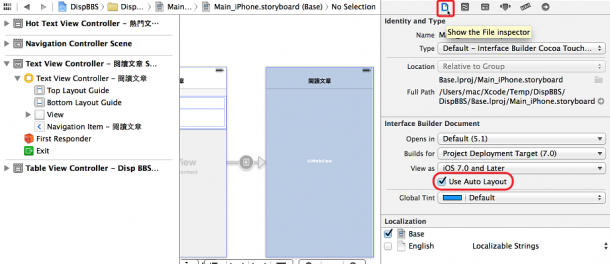
如果想要版面會自動調整的話,就要在 storyboard 設定 auto layout
到 storyboard,點一下 File設定
確認這邊的 Use Auto Layout 有勾選 (預設就是使用 Auto Layout)
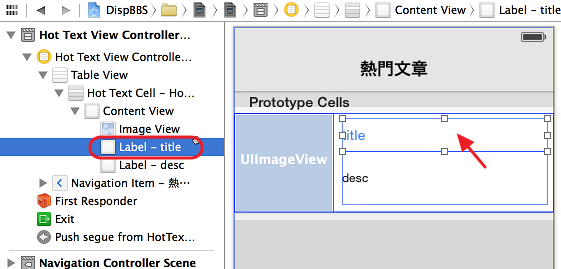
先點選熱門文章頁的 Label – title
我們希望他能在橫放時自動變寬
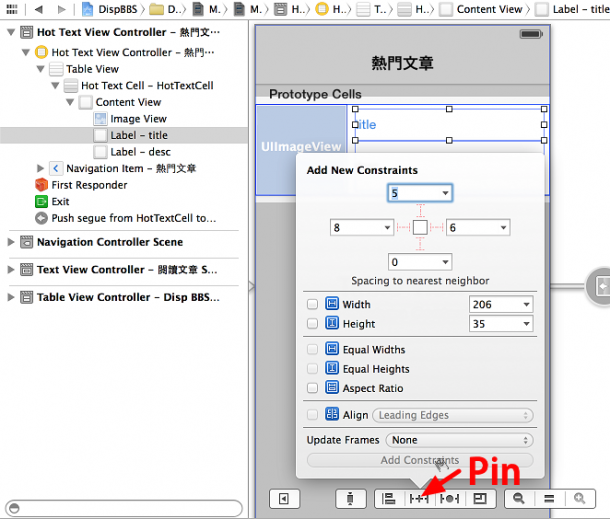
點一下下面的「Pin」
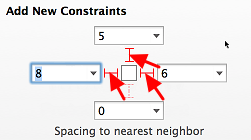
點一下上、左、右,三個方向的虛線,讓他變成實線
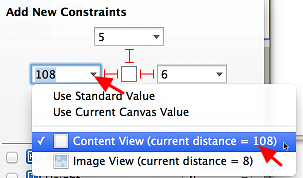
點一下左間距的下拉箭頭,選擇是與「Content View」的間距,而不是 Image View
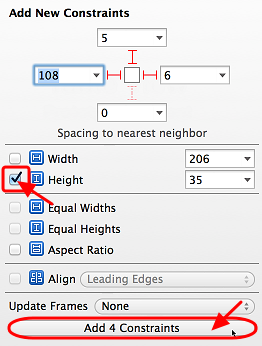
點一下「Height」固定高度後,點「Add 4 Contraints」
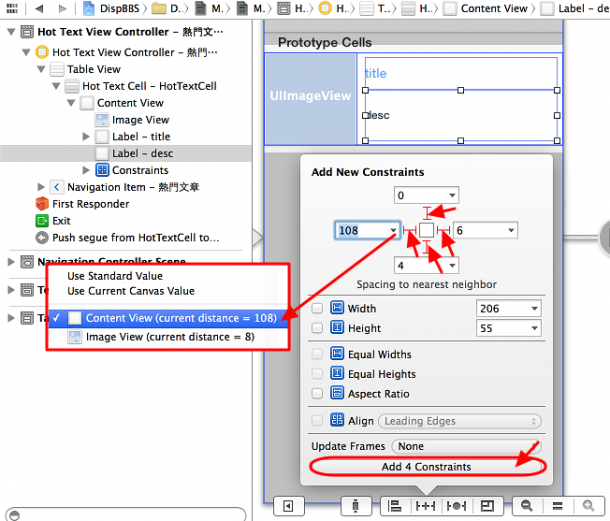
接著幫 Label – desc 加上四個方向的 Contraints
左邊一樣要改成與 Content View 的間距
上方的間距就保持為與 Label – title 的間距即可
加上這些 Constraints 後,當版面大小改變,例如 cell 變寬時
Constraints 的設定會優先於元件的 Size 設定
所以 title 和 desc 的左右間距不會變,而是寬度會跟著變寬
由於元件只要設了左右的 Constraints 後,就會出現上下的位置不確定的警告訊息
所以雖然 cell 的高度不會變,但還是得設定上下的 Constraints
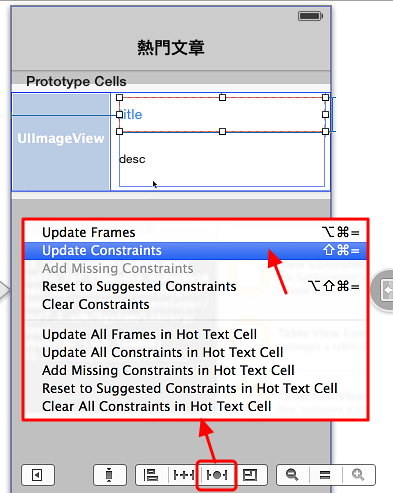
注意加了 Constraints 後,如果又調整了 Label – title 的位置或寬高
會出現警告:「Frame for “label -title” will be different at run time.」
只要點選 Label – title 後,再點下面的「Resolve Auto Layout Issues」按鈕
選「Update Constraints」即可將 Constraints 的值重新設定

執行看看,在模擬器按 command+→
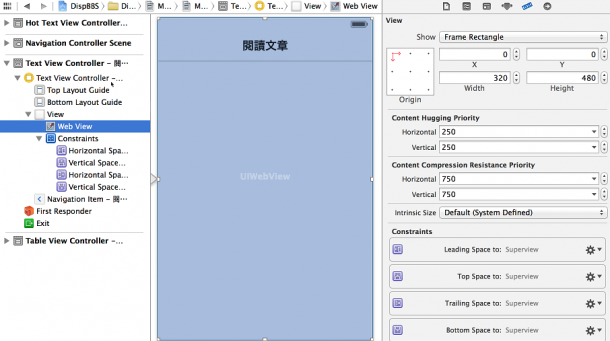
在閱讀文章頁,將 Web View 也加上四個方向的 Constraints
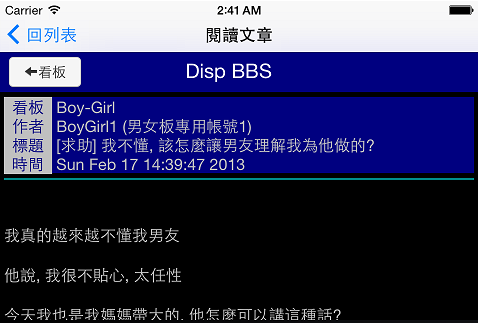
執行看看
◎ 設定 iPad 的 storyboard
到這邊已經沒什麼問題了
不過只有設定 iPhone 的 storyboard 而已
還要在 iPad 的 storyboard 照前面的步驟再全部設定一次
- 刪除預設的空白 View Controller 頁面
- 拉一個 Navigation Controller 進來,後面會附帶一個 Table View Controller
- Table View 上方的 Navigation Item,屬性設定的 Title:「Disp BBS」,Back Button:「主選單」
- Table View 的屬性設定,Content:「Static Cells」
- Table View Section 的屬性設定,Rows:「1」,Header:「看板討論區」
- Tabel View Cell 的屬性設定,Style:「Basic」,Image:「HotText.png」
Size設定,勾選「Custom」,Row Height:「80」 - Label – Title 的 Text 改為「熱門文章」,Font:「System 60.0」,Alignment:「置中」
- 再拉一個新的 Table View Controller 進來
- 按住 Ctrl鍵,將前一個 Table View 的 Row 拖到新的 Table View,選 Selection Segue 的「Push」
- 新的 Table View 上方的 Navigation Item,屬性設定 Title:「熱門文章」,Back Button:「回列表」
- 新的 Table View Controller 的 Identity設定,Custom Class 為「HotTextViewController」
- Table View 的 Size設定,Row Height:100
- Table View Cell 的 Identity設定,Custom Class:「HotTextCell」
屬性設定,Identifier:「HotTextCell」 - 拉一個 Image View 與兩個 Label 進 HotTextCell 裡
Image View 的屬性設定,Mode:「Aspect Fill」, Drawing: 勾「Clip Subviews」
Size設定,X:15, Y:0, Width:150, Height:100
第一個 Label 的屬性設定,Text:「title」, Color: 淡藍色, Font:「System Bold 20.0」
Size設定,X:175, Y:5, Width:550, Height:25
第二個 Label 的屬性設定,Text:「desc」, Font:「System 17.0」, Lines:3
Size設定,X:175, Y:30, Width:550, Height:65 - HotTextCell 的 Connections設定,將 Outlets 裡的 thumbImageView、titleLabel、descLabel
右邊的圈圈分別拉至對應的三個元件 - 拉一個新的 View Controller 頁面進來
- 按住 Ctrl鍵,將熱門文章頁的 Hot Text Cell 拖到新的 View,選 Selection Segue 的「Push」
- 設定新的 View 上方的 Navigation Item,Title:「閱讀文章」
- 新的 View Controller 的 Identity設定,Custom Class 為「TextViewController」
- 拉一個 Web View 進 Text View Controller
- Text View Controller 的 Connections設定,將 Outlet 裡的 webView 右邊的圈圈拉至 UIWebView
- 設定熱門文章頁,title 與 desc 四個方向的 Constraints
- 設定閱讀文章頁,Web View 四個方向的 Constraints

最後的結果像這樣
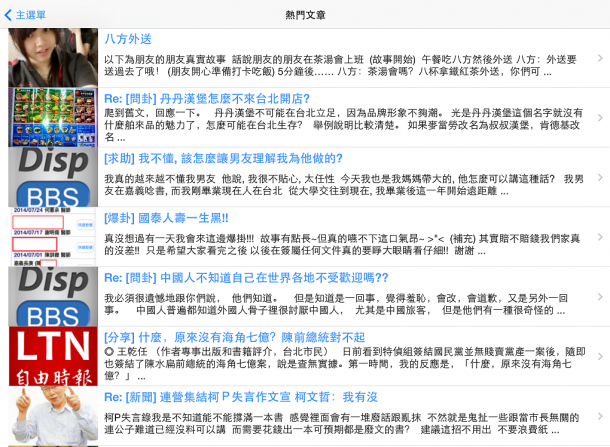
將模擬器改為 iPad Retina,執行看看
若螢幕不夠大的話,可以按 command+→ 轉成橫的再看
全文出處及作者:Disp BBS(本文經作者授權同意轉載)
|
|

